Though orchids have beautiful flowers which are colorful and fragrant in nature that make this plant popular. But due to some reasons this plant is difficult to care for, which sometimes leads to death of this plant. So, in this comprehensive guide you will learn how to save your orchid with comprehensive instructions and tips from experienced gardeners. In this guide you will get the knowledge you need to revive dying orchids and keep them healthy for years to come. You will also learn how to diagnose and treat the common problems that plague orchids, and bring your beloved plant back to life.
Orchids are beautiful and delicate flowers that can be difficult to care for. However, with the right steps and knowledge, you can successfully save a dying orchid. In this article, we’ll discuss how to save a dying orchid in stepwise detail. From identifying common causes of an unhealthy orchid to providing the proper care and maintenance, such as proper light, water, and soil conditions, this guide offers practical tips and advice on how to revive your blooms.
Why does roots of my Phalaenopsis Orchids keep dying?
Orchid roots help the plant to absorb essential nutrients for growth, it is not uncommon for them to die under certain conditions. Understanding why this happens is the key to maintaining the health of your orchid.
When an orchid’s roots die, it is usually due to one of two reasons: waterlogged soil or dry soil. Both can be detrimental to an orchid’s root system and prevent it from receiving the proper nutrition it needs for survival. If too much water accumulates in the soil, oxygen levels drop and can cause root rot which will eventually lead to death if not treated promptly. On the other hand, when soil is too dry and lacks important moisture, roots become brittle and break easily, leading them down a path toward death as well.
Signs or Appearance to know if my Orchid is dead?
When a beloved orchid plant dies, it can be heartbreaking to watch its vibrant colors and petals fade away. But what exactly causes an orchid to die? Many factors can contribute to the death of an orchid, ranging from improper care to disease. Appearance is one of the primary indicators of the health of your orchid plant. Discolored foliage, wilting blooms and brown spots are all signs that something may have gone wrong with your plant’s care.
The first step in determining why an orchid has died is to inspect it for obvious signs of damage. If you see any discolored or yellowing leaves or drooping flowers or wilted root stem, these are likely symptomatic of environmental stressors such as too much sun, too little water, incorrect temperature levels, etc. It could also be indicative of root rot caused by overly wet soil conditions which lead to poor ventilation.
What to do if the Orchid Plant starts dying?
Moths are a popular and beautiful addition to homes and gardens. But if your orchids/orchid’s leaves start dying, you may be wondering what the cause could be and how to fix it. There are plenty of things you can do to care and to revive your dead orchid, from watering properly to providing the right kind of light for your plants.
First off, look at the soil moisture levels. Orchids need very specific amounts of water so make sure that your plant is neither over- or under-watered by using an electronic soil moisture meter. You should also check for pests such as mealybugs, aphids, thrips, or spider mites which can sometimes attack these delicate flowers. Make sure to inspect them regularly for any signs of infestation and treat them with appropriate insecticides if necessary. By trimming out, by repotting, by hydrating, by applying some light and fertilizer to the plant you can revive orchids without leaves.
How to save if roots of an Orchid dies, will it regrow?
If a person notices that their orchid’s roots are starting to die, it can be easy to panic. Fortunately, there are some simple steps people can take to save their beloved orchid.
First, people should carefully inspect the root system and remove any dead roots. Next, they need to repot the orchid in fresh soil with plenty of drainage holes and make sure not to overwater it from this point on. It is important that people use a potting mix specifically designed for orchids as regular potting soils don’t provide enough air circulation for healthy root growth.
Recognition of the Exact problem that is the Cause of the orchids plant death?
Identifying the exact cause of why an orchid plant is dying can be difficult and complex. Understanding the symptoms can help narrow down the possible causes, but without proper diagnosis and care, it may be difficult to save a failing orchid.
The first step in recognizing what is causing an orchid plant’s death is to observe its general health over time. By noticing common signs of an unhealthy orchid, additionally, identifying any pests on the leaves or roots can indicate an underlying issue that needs to be addressed immediately if it has not already done irreparable damage.
Why root rot occurs and How to cure? Can we save an Orchid without roots?
Root rot is a common problem for Moth orchid growers, it occurs when the roots of this plant are exposed to too much moisture. Root rot can be devastating to an orchid, leading to reduced vigor and flowering, and can even cause the plant to die if left untreated.
Fortunately, root rot is relatively easy to identify and treat if it’s caught early enough. The most obvious sign of root rot is soft, discolored roots.If there’s any evidence of this then immediate action should be taken as soon as possible by repotting into fresh potting media with better drainage capabilities. In more severe cases, you may need to trim away affected parts using clean scissors that have been sterilized with rubbing alcohol before repotting into fresh soil mix.
These plants with no roots can even survive or be saved for a specific period of time just by repotting technique.
Symptoms of rot and Signs of dying stem? Why is my Orchid stem turning brown?
Stem rot is a serious condition that can affect orchids and other plants. It is caused by a wide variety of fungi, bacteria, and viruses. Knowing the symptoms of stem rot in orchids can help gardeners identify it early on to prevent further damage.
The most visible symptom of stem rot in orchids is wilting leaves and soft, mushy stems. Other signs may include discolored spots on the foliage as well as dark streaks running up the stem from the base. Leaves may also appear yellowed or twisted abnormally due to lack of nutrients going to them from the diseased root system. In severe cases, entire stems may collapse completely with an unpleasant odor coming from them. By spraying hydrogen peroxide on fungus affected areas, this problem of stem rot can be treated.
Also Read: Moth Orchids (Phalaenopsis Amabilis) Plant: Best Care Guide, Information and Tips to Grow
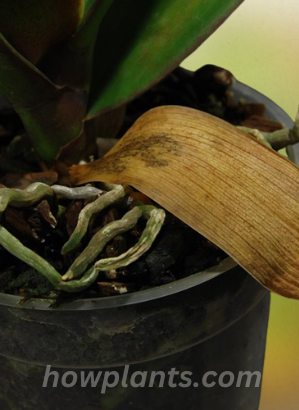
Why does browning of leaves of Orchids occur and how to treat it?
The browning of orchid leaves can be unsightly for any orchid lover. The good news is that there are ways to prevent this from happening in the first place, as well as treatments when it does occur.
If the plant has been overwatered, the water will cause root rot which can lead to discoloration and wilting of leaves. Not enough water or too much fertilizer can also cause leaf browning due to nutritional deficiencies. Additionally, extreme temperatures and direct sunlight exposure could also lead to this issue.
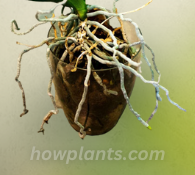
Benefits of Aerial roots of orchids in case of root rot
Many species of orchid can form aerial roots, which are useful in cases of root rot. Root rot also occurs when the orchid’s roots become infected by fungi and other microorganisms. Aerial roots provide several advantages in terms of controlling this issue.
Aerial roots are thin, air-filled structures that grow out from the stem and hang freely in the air instead of being buried in soil. They absorb humidity from the air as well as water from misting, helping to prevent root rot that would normally occur when moisture accumulates around an orchid’s submerged root system. In addition, these aerial roots often develop a waxy coating for further protection against fungal infections.
Why Stem rot occur and How to cure Orchid from it?
Stem rot of orchids is a fungal disease that can affect the entire plant, including the stems, roots and leaves. Most often, stem rot of orchids is caused by fungi in the soil that make their way into the roots and spread to other parts of the orchid. In some cases, it may be due to improper watering techniques or excessive fertilizer use.
Stem rot of orchids typically causes a blackening and softening of affected areas on the stems, leading to wilting and eventually death if left untreated. The best way to prevent stem rot of orchids is by ensuring proper watering techniques are employed and fertilizers are used sparingly. If caught early enough, stem rot can be treated with fungicides available at most garden centers.
Treating Orchid’s root rot by removing plant from Old media and replacing it with New media
One method of treating root rot in orchids is to remove the plants from their old media and replace it with new media. This procedure helps to reduce the risk of spread of infection and encourages more effective absorption of nutrients in the new environment.
Before attempting to remove an orchid plant from its old media, it’s important to assess the extent of damage due to root rot. If the majority of roots are affected by fungal growth and decay, then removing them from their existing potting mix may be beneficial. To do so, carefully take out each plant from its container and gently shake away as much soil as possible with your fingers. Dispose of any infected soil that may remain on the roots before repotting into fresh medium.
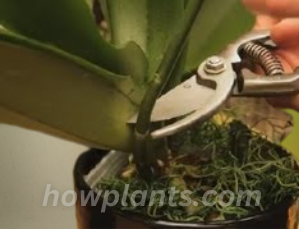
Orchid’s root rot treatment by Cutting and Removing dead roots
Fortunately, root rot can be treated by removing dead roots with a few simple steps.
The process of removing dead roots begins by carefully lifting the orchid out of its potting container and inspecting for any signs of root rot. Any visible blackened or browning areas on the roots should be cut away with sterilized scissors. When cutting away affected areas, it is important to cut back far enough so all infected areas are removed, while still leaving behind healthy white parts of the root.
Orchid’s root rot treatment by Repotting with Procedure
Reporting the problem early on can help significantly reduce the spread of disease and increase the chances of saving your beloved orchid. With proper knowledge and skill, you can quickly identify signs of root rot and begin treatment immediately.
If left untreated, this condition will eventually kill the entire plant. To prevent further spread of disease you should immediately isolate any affected plants from other healthy ones around them.
Avoid rot root by keeping Orchid Plant at a Warm Place
To prevent your plant from root rot, it is important to keep your orchid plant at a warm place and ensure proper ventilation.
The key temperature range for an orchid plant should be between 60-75 degrees Fahrenheit. If the space where you have placed your orchid is cooler than this – for example, if it’s in an unheated garage – then you may need to take some steps to ensure that it stays within this optimal range for its health and well-being.
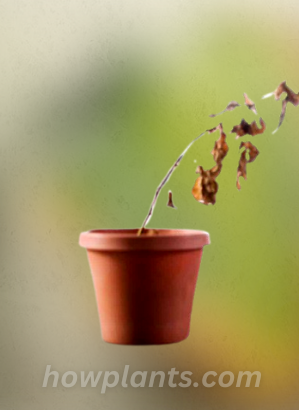
Underwatering can lead to the orchid’s plant dried out so be careful with watering.
Summary
As orchid plants have geometrically designed petals with beautiful colors which make them attractive and popular houseplant. But due to some reasons this plant died. So in this article you will learn how to save a dying orchid with step by step instruction. The reason why this plant is dying and how to diagnose the health of this plant from the symptoms and how to cure these problems like root rot, fungal infections, over-watered plant, under-watered plant, right amount of nutrients and fertilizer all are well explained in this little comprehensive guide.